How to Tag Your Google Ads to Track in PayHelm

This article focuses on Google Ads, but the same logic applies to all advertising platforms.

Understanding URL Parameters

URL parameters are pieces of information added to the end of a web address (URL) to pass data about the user’s activity or the source of traffic. They are commonly used in marketing, analytics, and development to track and personalize user experiences.

URL parameters help you measure how effective your ads are. They show where your ad traffic comes from and which ads drive conversions. For example, URL parameters reveal which link was clicked to reach your website or Facebook Page.

Structure of URL Parameters

Parameters are added to a URL after a question mark (?) and consist of key-value pairs separated by an equals sign (=). If there are multiple parameters, they are separated by an ampersand (&).

Example URL with Parameters:

https://www.example.com?utm_source=google&utm_medium=paidads&campaign=spring_sale

How to Add URL Parameters in Google Ads

Follow these steps:

  1. Create or edit a campaign:
    • Start a new campaign or continue editing a draft in Google Ads.
  2. Go to the Ad level:
    • After completing the Campaign and Ad Group levels, move to the Ad level.
    • Click the ad in the ad group in question to edit it, scroll down to the Final URL field.
  3. Enter your parameters:
    • You can add parameters directly to the Final URL field.
    Example:
    • If you have utm_source=1 in the Final URL field and utm_source=2 in the URL Parameters field, the Final URL will use utm_source=2.
  4. Define your parameters:
    • Each parameter consists of a key (e.g., “background”) and a value (e.g., “blue”), connected with an equals sign (=).
    • Separate multiple parameters with an ampersand (&).
    Example:
    • To track an ad with a blue background:
      • Add background=blue.
      • The Final URL might look like: www.example.com?background=blue.
  5. Avoid empty parameters:
    • Always include a value for each key.
    • Example of incorrect usage: www.example.com/page?background=&foo=bar.
    • Correct usage: www.example.com/page?background=blue&foo=bar.
  6. Save your changes:
    • Click Save to save. The URL parameter will appear in the field.

Recommended Tags to Use for Google Ads to Track in PayHelm

We recommend using the following tags on your links to track:

  • utm_medium=paidads
  • utm_source=google
  • utm_campaign={campaignid}
  • utm_content={creative}
  • utm_id={campaignid}

How to Tag Your Meta Ads to Track in PayHelm

This article focuses on Meta Ads, but the same logic applies to all advertising platforms.

Understanding URL Parameters

URL parameters are pieces of information added to the end of a web address (URL) to pass data about the user’s activity or the source of traffic. They are commonly used in marketing, analytics, and development to track and personalize user experiences.

URL parameters help you measure how effective your ads are. They show where your ad traffic comes from and which ads drive conversions. For example, URL parameters reveal which link was clicked to reach your website or Facebook Page.

Structure of URL Parameters

Parameters are added to a URL after a question mark (?) and consist of key-value pairs separated by an equals sign (=). If there are multiple parameters, they are separated by an ampersand (&).

Example URL with Parameters:

https://www.example.com?utm_source=facebook&utm_medium=paidads&campaign=spring_sale

Adding URL Parameters

You can include URL parameters when creating ads in Meta Ads Manager. These parameters work for:

  • Ads linking to external websites.
  • Ads promoting existing Facebook posts

How to Add URL Parameters in Ads Manager

Follow these steps:

  1. Create or edit a campaign:
    • Start a new campaign or continue editing a draft in Ads Manager.
  2. Go to the Ad level:
    • After completing the Campaign and Ad Set levels, move to the Ad level.
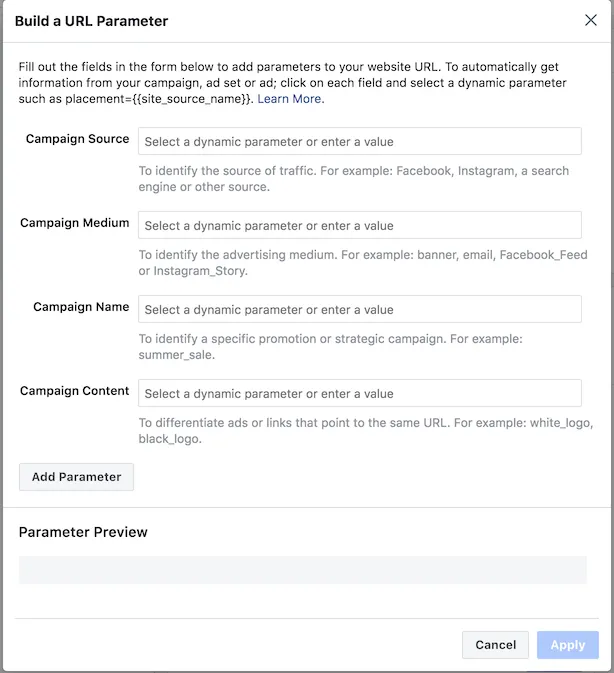
    • Click Build a URL Parameter under the Website URL field or in the Tracking section.
  3. Enter your parameters:
    • You can add parameters directly to the Website URL field or in the URL Parameters field.
    • If there are duplicates, the values in the URL Parameters field will override those in the Website URL field.
    Example:
    • If you have utm_source=1 in the Website URL field and utm_source=2 in the URL Parameters field, the final URL will use utm_source=2.
  4. Define your parameters:
    • Each parameter consists of a key (e.g., “background”) and a value (e.g., “blue”), connected with an equals sign (=).
    • Separate multiple parameters with an ampersand (&).
    Example:
    • To track an ad with a blue background:
      • Add background=blue.
      • The final URL might look like: www.example.com?background=blue.
  5. Avoid empty parameters:
    • Always include a value for each key.
    • Example of incorrect usage: www.example.com/page?background=&foo=bar.
    • Correct usage: www.example.com/page?background=blue&foo=bar.
  6. Apply your changes:
    • Click Apply to save. The URL parameter will appear in the field.

Meta Ads also have a URL parameter builder if you need additional guidance or are not comfortable creating the parameters yourself:

Recommended Tags to Use for Meta Ads to Track in PayHelm

We recommend using the following tags on your links to track:

  • utm_medium=social
  • utm_source=facebook
  • utm_campaign={{campaign.name}}
  • utm_content={{ad.id}}
  • utm_id={{campaign_id}}

PayHelm Partners with WooCommerce to Provide Advanced Reporting for WooCommerce Merchants

Announcing PayHelm for WooCommerce: A Game-Changing Partnership

PayHelm is excited to announce its new partnership with WooCommerce, the leading WordPress-based ecommerce platform which helps merchants and developers build successful businesses for the long term. This collaboration brings powerful, customized ecommerce insights directly to WooCommerce merchants, helping them make faster, more informed decisions to grow their businesses.

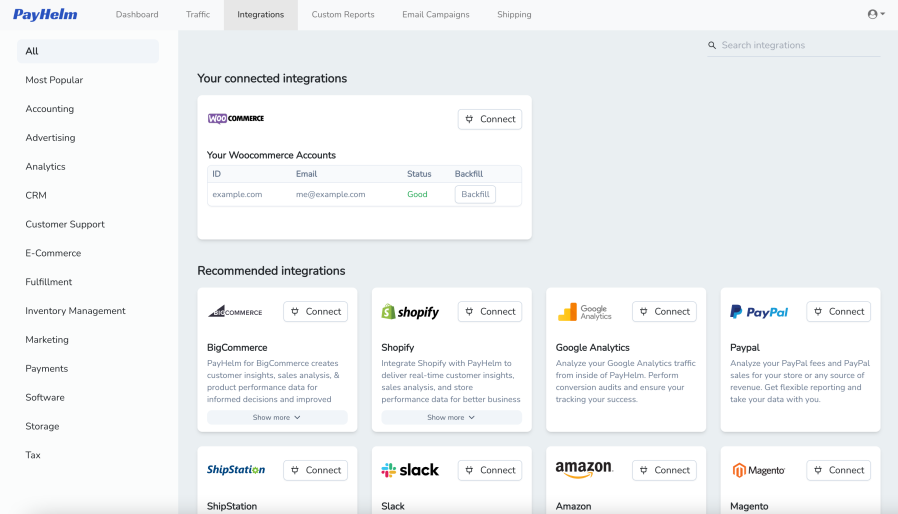
The PayHelm extension for WooCommerce offers a comprehensive data analytics and reporting dashboard, providing merchants with a unified view of their store’s performance. From sales and inventory to marketing and logistics, every aspect of the business is captured and analyzed. The extension also integrates seamlessly with dozens of third-party platforms like Google Ads, PayPal, Klaviyo, and more, ensuring a data-rich experience.

Unlock the Power of Your WooCommerce Data

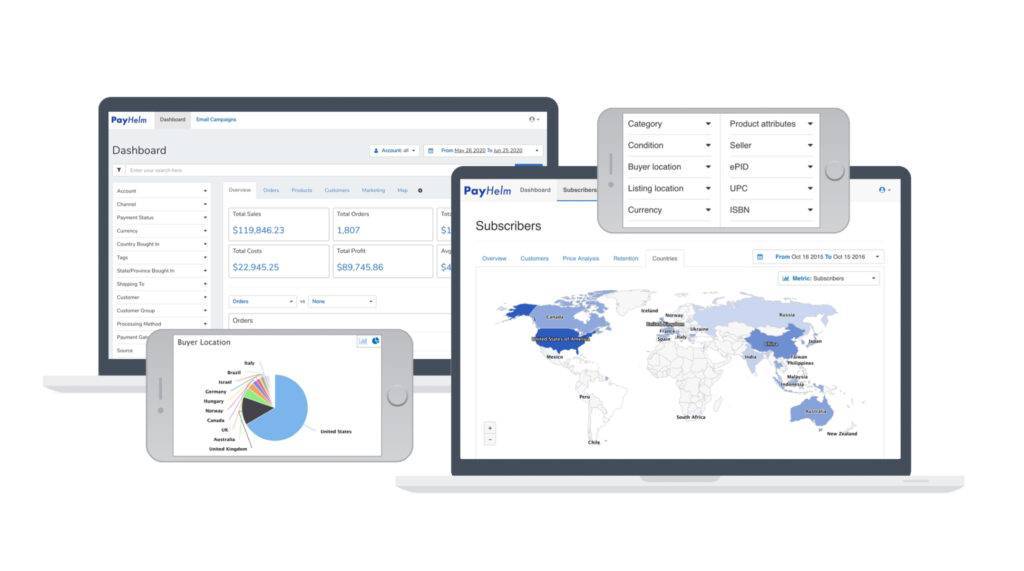
With PayHelm’s integration, WooCommerce merchants gain access to over 300 pre-built reports and intuitive dashboards. These insights empower businesses to understand their customers better, optimize their operations, and boost sales and order volume.

“We’re thrilled to partner with the PayHelm team to provide merchants with powerful, easy-to-use analytics tools that will help them gain deeper insights into their business,” said De Wet Huysamer, Senior Director of Strategic Partnerships at WooCommerce. “This collaboration aligns perfectly with our efforts to help businesses unlock the power of their data to grow sales, tap into new customers, and improve overall efficiency.”

Andrew E.R. Sukow, CEO of PayHelm, added, “Partnering with WooCommerce allows us to provide merchants with comprehensive data insights and powerful marketing analytics. Together, we’re helping businesses turn their store data into actionable strategies that drive performance and growth.”

This collaboration marks a new era of data-driven decision-making for WooCommerce merchants, enabling smarter, faster, and more efficient ecommerce operations.

Custom Columns, Calculations & Reports

Introducing Custom Columns in PayHelm

Our custom columns feature offers users a dynamic toolset for crafting unique metrics and incorporating custom calculations into your data analytics. Imagine you’re using our app to analyze your data. With the custom columns feature, you’re not limited to pre-defined metrics or calculations. Instead, you have the freedom to design and implement your own, giving you unparalleled control over how you interpret and utilize your data.

Whether you’re tracking sales performance, monitoring website traffic, or analyzing customer feedback, this feature puts the power in your hands to create metrics that reflect the exact insights you’re seeking. Plus, it’s incredibly intuitive to use, allowing you to seamlessly add, edit, and manage your custom columns.

By incorporating custom columns into your data analysis workflow, you’re not just crunching numbers – you’re crafting a tailored approach that aligns perfectly with your unique business objectives or personal interests. So, dive in, explore, and unleash the full potential of your data analysis with our custom columns feature.

How to Create Custom Columns in PayHelm

Creating custom columns is a breeze! Just follow these simple steps:

  1. Go to the “Reports” section in PayHelm.
  2. Look for the “Create New Report” option.
  3. Choose “Custom – Order Based” as your report type.
  4. Voila! You’ll find the custom column tab right there, ready for you to craft your unique metrics and calculations.

Once you’ve done that, here’s a few steps to follow to properly configure your custom column definitions:

Define: Conditional (Optional)

If you want to include a condition for your custom calculation, you can specify it using the following format:

[Key] [Comparison Operator] [Value]

or

([Key] [Comparison Operator] [Value]) and ([Key] [Comparison Operator] [Value]) – For Grouping format

Example 1: total_sales > 1000

Example 2: (customer_company == “Google”) and (total_sales > 1000)

Note: When utilizing text or characters as values, it is necessary to enclose them within double quotation marks.

Available keys for conditions:

customer_id, name, customer_email, customer_phone, customer_company, customer_group_name, tax_exempt_category, customer_form_fields, shipping_form_fields, billing_full_address, shipping_full_address, billing_street_address, shipping_street_address, shipping_city, shipping_province, shipping_zip, last_order_date, total_tax, tax_rate, gross_tax_rate, total_costs, gross_margin, merchant_id, grand_total, total_shippings, total_cost_of_refunds, total_store_fees, avg_shipping, total_discounted_orders, total_store_credit_refund, total_shipping_refund, total_refund_tax, net_sales, avg_items_per_order, avg_price, total_items_sold, total_orders, total_sales, total_refunds, total_items_refunded, avg_fulfillment_time, min_fulfillment_time, max_fulfillment_time, total_profit, avg_tax, avg_order, max_sales, min_sales, max_tax, min_tax, max_shipping, min_shipping, max_discount, min_discount

Available comparison operators:

< (less than)

<= (less than or equal to)

> (greater than)

>= (greater than or equal to)

== (equal to)

!= (not equal to)

( and ) (parentheses for grouping expressions)

Define: Calculation (Required)

After specifying the condition (if applicable), proceed to define the calculation expression. Use the following format:

[Key] [Operator] [Value]

([Key] [Comparison Operator] [Value]) and ([Key] [Comparison Operator] [Value]) – For Grouping format

Example 1: total_sales + total_tax

Example 2: total_sales + 20000

Available keys for calculations:

total_tax, tax_rate, gross_tax_rate, total_costs, gross_margin, grand_total, total_shippings, total_cost_of_refunds, total_store_fees, avg_shipping, total_discounted_orders, total_store_credit_refund, total_shipping_refund, total_refund_tax, net_sales, avg_items_per_order, avg_price, total_items_sold, total_orders, total_sales, total_refunds, total_items_refunded, total_profit, avg_tax, avg_order, max_sales, min_sales, max_tax, min_tax, max_shipping, min_shipping, max_discount, min_discount

Available expression operators:

+ (addition)

– (subtraction)

* (multiplication)

/ (division)

% (modulo)

^ (exponentiation)

( and ) (parentheses for grouping expressions)

Available metrics:

Total Tax, Tax Rate, Gross Tax Rate, Total Costs, Gross Margin, Grand Total, Total Shippings, Total Cost of Refunds, Total Store Fees, Average Shipping, Total Discounted Orders, Total Store Credit Refund, Total Shipping Refund, Total Refund Tax, Net Sales, Average Items Per Order, Average Price, Total Items Sold, Total Orders, Total Sales, Total Refunds, Total Items Refunded, Total Profit, Average Tax, Average Order, Maximum Sales, Minimum Sales, Maximum Tax, Minimum Tax, Maximum Shipping, Minimum Shipping, Maximum Discount, Minimum Discount

How to Use PayHelm to Steer Your Ecommerce Success

Now more than ever, being intelligent about your ecommerce business means getting up close and personal with business intelligence. Business intelligence (BI for short) leverages software and services to transform your data into actionable insights, i.e., the info you need to succeed.

Nobody does that better than PayHelm. Why? Two words: Totally customizable. If you have a BigCommerce, Shopify, and/or WooCommerce store — or stores! — PayHelm provides an unparalleled array of analytics that can be tailored to your business like a bespoke suit, yielding richly detailed reports that will help your ecommerce enterprise grow and thrive.

You can be up and running in just five simple steps:

  1. Go to PayHelm.com; sign up via BigCommerce, Google, PayPal, or Shopify; and install the PayHelm app
  2. Agree to PayHelm’s Terms & Conditions
  3. Wait a minute while your store data (transaction history) uploads to PayHelm
  4. While you’re waiting, link additional sales channels
  5. Your new PayHelm Analytics Dashboard is ready to go!

Business intelligence literally makes you more intelligent about your business. That’s where PayHelm comes in: It crunches data about your products, your sales, and your customers across multiple BigCommerce, Shopify, and/or WooCommerce accounts and even across multiple platforms, including eBay and Walmart.

With PayHelm, you’ll really get to know your numbers. PayHelm will tell you which of your products are performing best and who your key customers are. Furthermore, PayHelm will reveal what marketing campaigns are making you the most money.

In addition, you can drill down into any aspect of your data to answer crucial questions and verify assumptions. PayHelm’s reports are so accurate, your finance team may not have to change a thing! And PayHelm covers your business worldwide.

Here are just a few of the sales reports you can create for your BigCommerce, Shopify, or WooCommerce Store:

  • Analyze product lines by
    • Total sales
    • Orders
    • Average price
    • Selling fees
    • Product cost
    • Gross margin
    • Profit
    • And more!
  • Filter sales data by time frames and compare performance
  • Get granular and check all product performance by keyword
  • Parse product sales by variant, SKU, or brand
  • Filter or create reports based on product details such as size, model, mix, etc.
  • Who purchases the most?
  • Which customers drive the most profits?
  • See trends in a single customer’s purchasing behavior over the past five years

You can do a deeper dive into any aspect of your customers’ data as well.

PayHelm is your new best friend when tax time rolls around, too. See what you’ve paid in taxes by country or state. PayHelm will also reveal which of your products are most profitable given any tax rate.

 Moreover, you can chart tax trends over time for any customer, customer group, marketing campaign, or custom data tag. Shopify storeowners can even compare shipping address/state vs billing address/state.

All of this meticulously dissected data is literally at your fingertips — only a few clicks away — thanks to PayHelm’s intuitive user interface. Like the Time Warp from Rocky Horror Picture Show, it’s just a jump to the left, then a step to the right:

When you “open” (i.e., log into) your Big Commerce, Shopify, or WooCommerce store, scroll down to Apps in the left-hand sidebar, then click on the PayHelm icon to launch the app and display your PayHelm dashboard.

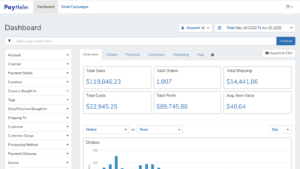
Next, step to the right, into your dashboard. There, the Overview screen gives you a macro, well, overview of your business.

Then jump to the left again, where PayHelm’s vertical navigation bar features expandable menus covering everything from Account to Vendor, including:

  • Account Channel
  • Payment Status
  • Country/Region Bought In
  • State/Province Bought In
  • Country/Region Shipped To
  • Customer
  • Customer Group
  • Processing Method
  • Payment
  • Gateway
  • Source
  • Fulfillment Status
  • Brand
  • SKU
  • Vendor
  • Product Type
  • Category
  • Tax Exempt Category
  • Product Options
  • Size
  • Color

Back to those steps to the right: Navigate from Overview to Orders (a list of your customers) to Products (sales breakdown by item) to Customers (micro-looks at each individual’s purchase history) to Marketing (campaigns) to Map (an actual zoomable map of where you’re selling to along with a table of metrics that even details your fulfillment times!).

Speaking of time, you can quantify that any which way your business heart desires: today or yesterday; this week or last week; this month or last month; this quarter or last quarter; the last 7, 14, 30, 90, or 365 days; or last year.

Click on the little gear icon to change your dashboard’s settings. This is where you get to specify just how far you want to drill down (Report Columns); exactly how granular you need to get (Metrics and Filters); and precisely how you prefer your data to be displayed (Column? Pie chart? Table?).

Finally, you can export the whole shebang to a CSV file at any point along the way.

We could go into even more detail about PayHelm’s wonderfully nuanced analyses, but that would spoil the fun of letting you click around and discover its analytical superpowers for yourself (and your business). If you get bogged down at any point, or just want to discuss some fine points, PayHelm’s customer support team has got your back — around the clock and around the world.

Here’s the kicker: If you find yourself needing BI beyond what’s currently offered, PayHelm’s savvy and customer-centric developers will listen to your request, then code it into the app for you PDQ.

How to Add Sales Tax Functionality to Your BigCommerce Store

So you’ve stocked your virtual BigCommerce store shelves with products to sell…set up your shipping methods and services…and configured payments. And you’ve just realized that you need to collect sales tax on purchases made from your online store.Now what? How do you set it up so that taxes are automatically calculated for your customers at checkout? Not to worry; we’ll walk you through it. But first, a little backstory.

Until a couple of years ago, sales tax was no big deal for ecommerce merchants. They only had to collect it if they sold something to a buyer located in a state in which the seller had nexus, which at that time was defined as a physical presence.

But on June 21, 2018, the Supreme Court changed all that with their ruling in South Dakota vs Wayfair. The Supremes decreed that although Wayfair did not physically have nexus in South Dakota, the online retailer was still liable for collecting and remitting state sales tax. And so were other ecommerce businesses with more than 200 transactions or $100,000 worth of goods sold in the state.

The word “nexus” means “a connection”, so this type of financial presence has become known as economic nexus. In other words, nexus can now be physical, or it can be fiscal. Either way, it means you have to charge sales tax!

Seeing a chance to bring in substantial revenue, other states were quick to jump on board the internet sales tax bandwagon. Their sales thresholds range from $10,000 to $500,00, with requirements for collecting and remitting sales tax differing from state to state. Multiplied by 45 states (5 don’t collect sales tax) and more than 10,000 tax jurisdictions nationwide, sales tax compliance has become a daunting challenge for ecommerce storeowners.

Luckily, there are apps for that. In fact, several of them are specifically designed for use with your BigCommerce store. You can opt to use one of those, or you can do your tax setup manually. Whichever route you choose to go, you’re going to start out the same way:

  1. Go to your store dashboard’s home page
  2. In the left-hand sidebar, click on Store Setup, then click on Tax
  3. Scroll down, and to the right of the subhead Tax Settings, click Edit

Your store’s tax settings control the way sales taxes are shown on your storefront as well as how they function within your store. To that end, begin by deciding what to call the tax applied to orders in your store — e.g., Sales Tax, GST, or simply Tax.

You also need to specify whether or not you want prices in your store to include tax. This setting will apply to all of your products. Unless you serve a local market with a single tax rate, it’s better to leave that setting on the default option, which is “The prices in my store are entered exclusive of tax.” Most online stores serve multiple markets with different tax rates, so this allows variable taxes to be added to a consistent base price.

The next setting is Fallback Tax. This applies only when your enabled automatic tax provider cannot be reached. You can either charge a flat 10% or use your manual tax configuration (assuming you’ve completed a manual setup; if not, your fallback tax rate will be 0%).

After that, you’ll need to specify which address you’re going to use as the basis for calculating sales tax. Tax is usually charged based on the customer’s shipping address.

Then there are decisions to be made as to Tax Display Settings: How do you want prices to be shown with taxes on the control panel? On product pages? In carts and at Checkout? On invoices and order details pages? For more detailed advice on these settings, check out the BigCommerce Help Center’s Tax Overview.

Once all that’s been settled, it’s time to do the math — i.e., decide how you’re going to handle actually calculating those pesky taxes.

If your online business has complex tax issues, then you probably should use an automatic tax service. Doing so will save you both time and money. In addition, the peace of mind that comes from knowing your tax collection and filing is being handled by a third-party professional can be priceless.

BigCommerce has integrated with popular tax service providers like Avalara, Vertex, TaxCloud, and TaxJar. Each of them supports automatic tax calculation in buyers’ shopping carts and at checkout. They also handle document submission to your tax provider. You’ll find step-by-step instructions for automatic tax setup in BigCommerce’s Help Center.

In addition, BigCommerce tech support can help you ensure that:

  • Your automatic tax provider is correctly enabled
  • Your storefront tax display settings are properly configured
  • Your tax provider codes are properly applied to products and customers

However, their support team is not qualified to give tax advice per se.

If you decide to go the manual set-up route, be sure you already know the tax requirements for running your online store. Even if you think you know what you’re doing, it’s a good idea to check with your accountant and/or local tax authority.

As for doing the setup itself, you’d better be detail oriented. Because you’re going to have to:

  1. Create tax classes for all of your different product types
  2. Create and configure tax zones
  3. Then specify the tax rates for each zone

Again, you’ll find step-by-step instructions for manual tax set-up in the BigCommerce Help Center.

There’s nothing more certain than death and taxes, but sales tax doesn’t have to be the death of you!

Why It Pays to Get Pushy with Your Marketing — and How

When it comes to customer engagement and building your brand, it literally pays to be pushy. That’s because whether you’re nurturing leads, wooing previous customers, or reaching out to your most loyal fans, the most effective way to build connection is through communication.

Not too long ago, that meant email. But right now, the newest and best marketing channel through which to communicate is via push notifications: short, targeted messages that pop up on the screen of a customer’s mobile device or PC monitor.

For ecommerce stores, push notifications can be a golden ticket for customer retention. It’s a terrific way to reach — and re-engage — first-time visitors to your store who have not yet converted or come back. But wait, there’s more!

Back in the day, a well-worn marketing adage held that “He who has a thing to sell, but goes and whispers in a well, is not so likely to get the dollars as he who climbs a tree and hollers.” That was true then, but this is now.

Nowadays, hollering about your product to the world at large is liable to get you tuned out — click! In addition, a lot of your soundwaves would fall on deaf or at least uninterested ears. Today’s more targeted and effective strategy is akin to whispering not into a well, but directly into your customer’s ear.

To take the metaphor a few steps further, push notification marketing is like whispering into your customer’s ear while you stroll the length of the block with them. By the time you reach the corner, you and your customer are, if not quite friends yet, at least getting acquainted.

That’s the effect of what’s known as “drip marketing”: a steady series of messages at carefully calculated intervals sent to individuals who have visited your website or otherwise expressed interest in your product(s). These messages may be strategically timed, precipitated by certain actions on the individual’s part, or a mixture of both.

According to software firm Market2Lead, companies who use drip marketing slash the time it takes to make a deal by 23%.

The average consumer has a lot of pushy not-quite friends. But forget the clichéd visual of the fast-talking old school salesperson; these not-yet friends are apps and websites. Notifications are pushed through the app or from the website — hence the nomenclature — to the user’s mobile device.

Push notifications may be sent at any time. Their target doesn’t have to be using an app or their phone; in fact, the app doesn’t even have to be open. The average smartphone user looks at their screen 221 times a day. That’s literally every 2 minutes of an 8-hour day, or roughly every 3 minutes in a 12-hour day.

So sooner or later (probably sooner), they’re going to see your message. You can even use emojis in your notification to really catch the device user’s eye and set a friendly tone.

Of course, you obviously can’t stroll to the corner with every single customer, one at a time — even metaphorically. You’ve got to be able to scale. That means automating your push notifications. Fortunately, there are tools that make it easy to do so.

And you don’t even need an app for that! The leader of the pack in push notification automation is PushPro. It’s powerful, simple, and easy. PushPro doesn’t require a native app and takes about five minutes to install; another few minutes later, you’ll be creating and sending out automated PushPro notifications like a boss. Here’s how it works.

First, install PushPro either as a plug-in extension or manually by adding a single Javascript file plus a few lines of code to your website’s HTML. No need to set up a mailing list, as you would have to do for traditional email marketing!

Visitors to your online store are then prompted to opt into receiving your push notifications with just one click. Opt-in requests are fully customizable, too. No personal data is collected from those visitors, so you’re 100% sure to remain in compliance with the General Data Protection Regulation (GDPR) and similar rules.

Furthermore, PushPro lets you define your own audience, creating assorted segments via attribute rules. PushPro automatically calculates the estimated size of each segment and the reached target group.  This lets you create even more personalized and relevant notifications.

By this point, you’re metaphorically strolling all the way around the block, still whispering in your customer’s ear, so they’re really getting to know and like you — and your brand. That in turn predisposes them to shop with you.

PushPro notifications can be automated several different ways. You can set up drip messages; send notifications after a certain web page is visited; and/or you can set a trigger that generates a notification, such as when someone new subscribes to your website or an almost-customer abandons their shopping cart.

For example, you’ll want to welcome your new subscriber, while you might set up a message to push to the almost-customer telling them that you’ve saved their shopping cart and will discount their order by X% if they complete their purchase by X o’clock.

PushPro’s template builder lets you build an entire push campaign that reflects your brand. You can test and preview messages before you push them; you can also schedule notifications and save them as drafts. Basically, you’re creating the ultimate conversion funnel.

Finally, when someone opens a push notification you’ve sent them, it yields immediate results in real time. So PushPro can start crunching your data as fast as it comes in. Campaign statistics and other assorted reports give you all the metrics you need to evaluate the effectiveness of your campaign(s).

Communication. Engagement. Segmentation. Personalization. Promotions. Analytics. Plus every PushPro push notification drives traffic and conversions with a custom Call to Action (CTA) button. So get pushy, and put push notifications to work in your ecommerce business!

Smile, You’ve Got Big Data: Why You Need Business Intelligence

When it comes to ecommerce, retail savvy is no longer enough. You also need business intelligence (BI for short). Basically, BI takes all of the raw data generated by your ecommerce enterprise, analyzes and digests it, then spits out the information you need to make better, more informed decisions about marketing, sales, and other aspects of your ecommerce business.

Luckily for you, there’s an app for that. Specifically designed for ecommerce storeowners, PayHelm provides real-time analytics for your online retail business, translating customer info and sales data into reports that enable you to make decisions based on facts, not guesswork. A survey by Helical IT found that decisions made using facts had a 79% greater chance of success than decisions made via intuition

In fact, your ecommerce business is probably already generating, tracking, and aggregating the essential information you need to help it thrive and grow. Nowadays, even small and medium-sized businesses are producing mountains of big data, but there’s gold in them thar hills — if you know how to extract it.

According to a study by Nucleus Research, for every $1 a company spends on BI, it makes $10.66. That’s an ROI of more than 1000%! Furthermore, companies that make extensive use of customer data analytics in their business decisions see 126% profit improvement compared to companies that don’t use BI. So it literally pays to take advantage of the insights gleaned via business intelligence.

Best of all, BI can lead to higher sales and more satisfied repeat customers. Why? Because business intelligence can help you to better understand your customers and the market, highlight trends, and spot potential problems before they turn into pitfalls.

That’s where PayHelm comes in. This multifunctional BI tool crunches data as fast as it comes in. Then it makes analyses of that data available in various forms and formats, including charts and graphics that visually reveal trends and patterns.

A dashboard serves as Information Central, displaying and managing essential metrics such as key performance indicators (KPIs) and other relevant data points that help monitor the overall health of your ecommerce business. From there, you can drill down to the details that matter most.

In addition, ad hoc reporting enables the creation of dynamic, real-time data reports on an as-needed basis. These ad hoc reports are designed to answer a specific business question, usually in response to an event. Want to find out how well your last promotion did (or didn’t)? PayHelm can tell you with just a few clicks.

Speaking of marketing, business intelligence can break down your customer base into groups with similar characteristics. These groups are known as cohorts. BI uses cohort analysis to understand the trends and patterns of customers over time in order to better tailor the products offered to various cohorts along with helping to predict what new product(s) will be most likely to sell well.

Cohort analysis is very helpful in evaluating the results of your marketing efforts. It can also tell you which groups of customers are driving the most revenue.

Another major concern for ecommerce businesses is customer retention and its flip side, churn (a.k.a. customer attrition). Typically, for small and medium-sized businesses, 3%-5% is considered to be a “good” churn rate.

To calculate your business’ churn rate, take the number of customers you lost last quarter and divide it by the number of customers with which you started. To determine the lifespan of your average customer, divide 1 by your churn rate.

BI software like PayHelm can help you predict churn and even suggest ways to combat it.

Here are some more examples of the statistical gold that PayHelm can mine from your motherlode of ecommerce data:

  • Performance metrics reveal your business’ actions, abilities, and overall quality.
    • Product analysis – total sales, orders, and average price
    • Global sales – analyzed by location
    • Product performance – keyword analysis
  • Profitability analysis (e.g., how much your business makes from each $1 in sales)
  • Trend and problem indicators. Ecommerce KPIs include…
    • Average order value
    • Conversion rate
    • Cost of goods sold
    • Gross and net profit

Thinking of adding another sales channel (or channels)? PayHelm can help you there, too; it can analyze various factors across multiple ecommerce platforms, including BigCommerce, Shopify, and PayPal. You can also control user access to data — e.g., who can see what — as well as export, manage, and save your data in CSV format.

PayHelm is here to handle your business needs with its user friendly reports. Your marketing team, accounting team and leadership team will all love being on the same page. Try it now for free.

Why Repeat Customers Are the Lifeblood of Your Ecommerce Business (And How to Woo Them)

Smart retailers both online and off value one kind of customer above all others: repeat buyers. Why? Because the most profitable customers are those you already have, so it pays to keep them coming back.

The average ecommerce storeowner spends more than 80% of their marketing budget on customer acquisition. Yet an Adobe Digital Index study that analyzed data from 33 billion visits to 180 retail websites showed that more than 40% of the total revenue generated came from only 8% of the sites’ visitors: namely, returning customers (those who bought once before) and repeat buyers (those who made at least 2 previous purchases).

In fact, 61% of small and medium-size businesses report that more than 50% of their revenue comes from repeat customers. During economic slowdowns and the holiday season, returning and repeat purchasers account for even more revenue

It’s less expensive to retain customers than it is to acquire them. It takes 5-7 new shoppers to bring in the same amount of revenue as a single repeat buyer. In addition, it costs 5 times as much to acquire a new customer than it does to keep an existing one. Furthermore, it costs 16 times as much to bring a new customer up to the spending level of repeat purchasers.

It’s also easier to sell to repeat buyers: Whereas the average conversion rate for ecommerce businesses is 1%-3%, a repeat customer has a 60%-70% chance of converting. According to Adobe, repeat buyers are 9 times more likely to convert than a first-time shopper. This especially comes in handy when you’re introducing new products.

Repeat purchasers tend to spend more the longer they stay with you, too. A study by Bain & Co. shows that in the apparel category, a shopper’s 5th  purchase was 40% larger than their first purchase, while their 10th purchase was 80% larger.

But the payoff from repeat buyers doesn’t stop there. Repeat purchasers double as your best brand advocates, telling an average of 4-6 other people (50% more than one-time buyers) about their experience with you. That’s the kind of advertising money can’t buy!

Multiplied by social media, word of mouth from happy customers adds up to a whole lot of free marketing. It works, too: More than 90% of consumers trust and buy from a brand recommended by friends or family. In addition, 43% are more likely to purchase a new product after learning about it via social media.

But here’s the best news of all: A mere 2% increase in customer retention is the equivalent of cutting costs by 10%, while increasing customer retention by just 5% boosts the average company’s profitability by a staggering 75%.

So how difficult is it to get a customer to come back and shop with you again? After his or her initial purchase, there’s a 27% chance of that shopper returning. But if you can get them to come back for a second purchase, the odds of them returning again jump to 45%. After a third purchase, there’s a 54% chance that they’ll continue coming back.

But you don’t have to rely on chance. There are a number of proven strategies for enticing customers to shop with you again and again. And this being the 21st century, there’s an app for that. Smile.io specializes in loyalty programs for small businesses. Their goal is to help you build your repeat customer base into an engaged community, which in turn will enable you to grow your business.

An effective loyalty program helps you to establish and maintain an emotional relationship with every member of your community. It’s not just about discounts; simply offering the customer a discount on their next order may bring them back, but then they’ll expect a discount every time and/or wait until they receive one to make another purchase. Either way, it’s a downward spiral.

Nowadays, a well-designed loyalty program motivates valuable customer actions and increases engagement. It also creates an effective switching barrier: Your customers will be less likely to jump ship to a competitor if future rewards from you are in store for them!

You can reward customers for all kinds of activities in addition to purchases:

  • Account creation
  • Social media follows or shares
  • Birthdays
  • Referrals and reviews
  • Anything else you can think of

Smile.io integrates with BigCommerce, Shopify, Shopify Plus, and Wix, empowering you to create a customized loyalty program especially tailored to your ecommerce business via Points, VIP recognition, Referrals, and more. Their Resource Center features a reference library of ebooks — including industry-specific how-to guides — to help you get started. Finally, Smile-io also offers one-click integration with an impressive array of related tools.

So follow the smart money: Stop spending most of your marketing budget on customer acquisition, and start focusing instead on customer retention. Your bottom line will thank you!

Why Your Ecommerce Store Desperately Needs a Backup Strategy

It’s not a question of if you’re going to lose ecommerce store data. It’s a question of when — and how much!

The 2020 Ecommerce Data Protection Report says one of four online stores have permanently lost vital business data. Think images, product listings, customer information, inventory counts and much more.

All this information helps an ecommerce entrepreneur drive and grow their business. Without it, you are operating blind. And trying to restore it involves more than a few mouse clicks. Without a backup strategy,  if your web store goes down, and its data is lost, then you’re virtually (and maybe literally) out of business.

As an ecommerce entrepreneur, you’re busy sourcing, listing, selling, and shipping.. Your online store is humming along nicely — and even growing. But it could all go away in a nanosecond for way too many reasons. ECybersecurity professionals say that there are two kinds of people: those who have lost data, and those who are about to lose data. The three primary causes of data loss? Human error, software glitches, and malicious attacks.

Ecommerce businesses are particularly vulnerable to the latter. In fact, they’re the target of nearly 1/3 of all cyber attacks. In 2019 alone, 10% of small enterprises hit by cyber-attacks were forced out of business according to a 2019 report from CNBC.

Yet black-hat hackers are actually the least of your worries. It’s far more likely that your data will fall victim to people you know.  If you, an employee or contractor make a typo when tweaking the coding for your store’s theme, or that terrific new third-party app doesn’t play nice, it can wreak havoc with your site’s functionality and finances. In a survey of 300 ecommerce merchants, over 90% said sales would immediately nose dive if they lost business data:

As you can see, lost sales aren’t the only negative impact. First-time shoppers who come to your store may never come back, while repeat customers may find somewhere else to buy. They may decide that you’re no longer trustworthy.

In addition, you’ve lost all of the hard work, time, and money that went into building your store. Good luck re-creating it all from memory! Downtime also damages your SEO ranking and decimates productivity while all hands are on deck trying to get your store back up and running.  You need a backup strategy — and you need it at the most granular level. To be effective it should be

  • Updated as often as your website changes
  • Stored somewhere other than on your server/website
  • Easy to access and restore when you need it most

Your ecommerce service provider (e.g., Shopify or BigCommerce) unfortunately can’t do this for you. They operate on the basis of “shared responsibility”. That means they are responsible for their own software, infrastructure, and disaster recovery. If a rogue asteroid wipes out one of their data centers, they’ve got a macro-backup ready to use in recovering the platform and restoring it to its previous state.

But they can’t restore your individual account. As a merchant, you’re responsible for password security, permissions given to users and third-party providers, and (most importantly) backing up any data you put into your store.

That’s where a service like Rewind comes in. Recommended by both Shopify and BigCommerce, Rewind offers set-it-and-forget-it peace of mind, automatically backing up all of your cloud-based data every day. You can also run a manual backup any time you need to, such as before you attempt a bulk edit via CSV import. (CSV imports are notorious for causing data losses.)

Better yet, Rewind lets you restore lost data for a single item, multiple items, parts of your store, or your entire store. Think of it as a magic “Undo” button. With Rewind, you can be back in business in minutes instead of hours. You wouldn’t walk a high wire without a safety net — would you? — so don’t try to run your online store without one, either.

While PayHelm enables you to build the future of your business, Rewind empowers you to preserve its past and protect its present.